But when you have something that happens a lot, such as receiving a new email, then a notification sound that announces that can be unwanted. Fortunately, you can turn off the new message sound in Microsoft Outlook by following the steps in our tutorial below.
How to Stop the Microsoft Outlook Message Arrival Sound
Our guide continues below with additional information on how to stop the new message sound in Outlook, including pictures of these steps. Many people that use Microsoft Outlook to manage their emails will leave the program open on their computer while they are performing other tasks. This form of multitasking is very common because you do not need to keep returning to Outlook to check for new messages. Outlook 2010 employs a couple of notification options that will let you know when you have received a message. This feature is very helpful, but having a visual cue (the blue desktop notification at the bottom-right corner of your screen) as well as an audible option can be a bit unnecessary. The notification sound is made even worse if you are in a quiet office environment. Fortunately, it is possible to disable Outlook’s message notification sound while keeping the visual notification intact.
How to Turn off New Message Sound in Microsoft Outlook 2010 (Guide with Pictures)
I have experimented with turning off notifications entirely because I find that it is hard to stay focused if I need to open Outlook whenever a new message comes in, but this comes with one of two problems. You either become so involved in your other tasks that you forget to check Outlook, or you check it so frequently that you become less productive. That is why I have moved to a system where I keep the visual notification but disable the sound.
Step 1: Launch Microsoft Outlook 2010.
Step 2: Click the File tab at the top-left corner of the window.
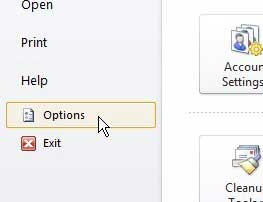
Step 3: Click Options at the bottom of the column on the left side of the menu.
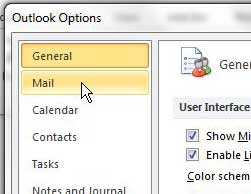
Step 4: Click the Mail tab at the left side of the Outlook Options window.
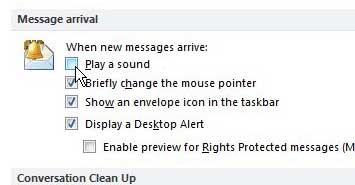
Step 5: Locate the Message arrival section of the menu, then click the box to the left of Play a sound to clear the check mark.
Step 6: Click the OK button at the bottom of the window to apply your changes.
You will notice that you have a couple of other options for configuring your new message notifications, so make any other additional changes from this menu that you feel will improve your experience with the program.
Additional Sources
After receiving his Bachelor’s and Master’s degrees in Computer Science he spent several years working in IT management for small businesses. However, he now works full time writing content online and creating websites. His main writing topics include iPhones, Microsoft Office, Google Apps, Android, and Photoshop, but he has also written about many other tech topics as well. Read his full bio here.
You may opt out at any time. Read our Privacy Policy


