Optimizing Images for the Web in Photoshop CS5
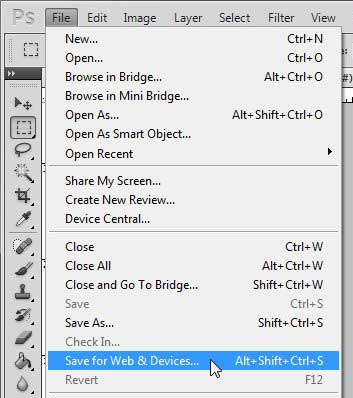
There is a lot of unnecessary file information in most of your images that can be harmlessly compressed or removed to reduce the size of an image file. This is where the majority of the file size reduction will come from. However, if you want to see some drastic file size changes, then there is going to be some loss of quality. Depending upon the subject of the image this might not be a big deal, but in certain situations you will need to sacrifice image quality for image file size. Step 1: Open the image that you want to save for the Web and devices in photoshop CS5. Step 2: Click File at the top of the window, then click the Save for Web & Devices option. Alternatively you can press Alt + Ctrl + Shift + S on your keyboard to open the same menu.
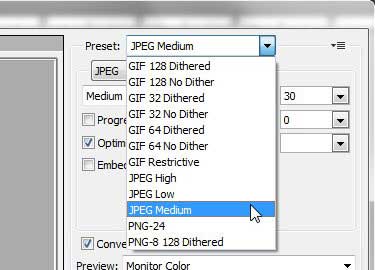
Step 3: Click the Preset drop-down menu at the top-right corner of the window, then choose the option that is appropriate for you. If you need to preserve transparency in your image, then you are going to need to select one of the PNG options. However, if transparency is not a concern, then I typically go with the JPEG Medium option. There is some noticeable quality loss, but the file size reduction is pretty impressive for the average image. That is the option that I use for most of the images that you see on this site.
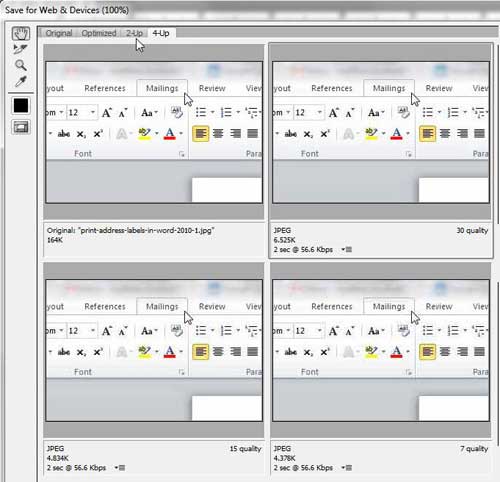
If one of the presets does not meet your needs, then you can manually select the type of compression you want to apply to the image by adjusting the image file type and quality options under the Preset drop-down menu. Additionally, if you want a little help choosing between some different options, you can click the 2-up or 4-up tabs at the top-left corner of the window.
This will show you some previews of your image with different settings, as well as the file size that those settings will produce. The settings and file size for each version of the image are shown underneath each sample. Step 4: Click the Save button at the bottom of the window when you have finished adjusting the settings for your image. Step 5: Choose a location and file name for the resulting image (if you are keeping the same file name be sure to save the file to a different location so that you do not overwrite the original), then click the Save button. Step 6: Close the original image without saving it to preserve the file in its’ original state. To anyone that is looking for a replacement to the awesome Smush.it plug-in for WordPress, this is what I have been doing since the Smush.it service became unreliable. The JPEG Medium image settings usually result in smaller file sizes than what Smush.it was producing, but I definitely miss the simplicity of using that plug-in. After receiving his Bachelor’s and Master’s degrees in Computer Science he spent several years working in IT management for small businesses. However, he now works full time writing content online and creating websites. His main writing topics include iPhones, Microsoft Office, Google Apps, Android, and Photoshop, but he has also written about many other tech topics as well. Read his full bio here.
You may opt out at any time. Read our Privacy Policy