A word processing program in today’s day and age needs to be more than just a basic text editor. It needs to have tools that allow you to add content from the Internet, it needs access to templates that make document creation easier, and it needs tools that can check your work for mistakes. Microsoft Word 2010 is an industry leader in word processing programs so, of course, it has all of these things. But not all of the settings that you might need are enabled by default, so you need to do some tinkering within the program to get it to operate the way that you want. Luckily it can check your document for instances of passive voice usage, and allow you to correct those before you submit the document to someone that could penalize you for using it. You can continue reading below to see how to use the passive voice checker in both Word 2010 and Word 2013.
How to Check for Passive Voice in Microsoft Word 2010
Our article continues below with additional information on checking passive voice in Word 2010, including pictures of these steps.
How to Check Passive Voice in Word 2010 Documents (Guide with Pictures)
There are many situations where a passive voice checker could come in handy, so it is a little surprising that it is not enabled in Word 2010 by default. It would be one thing if you needed to install a plug-in or add-on to gain that functionality, but it is built-in. Luckily it is a simple matter to have the Spelling and Grammar checker look for passive voice, so you can simply follow the instructions below to include that search whenever you run the tool.
Step 1: Open Microsoft Word 2010.
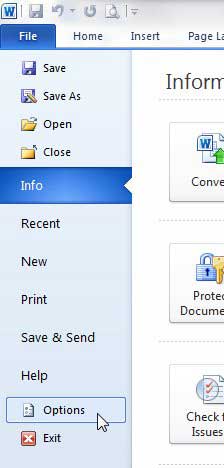
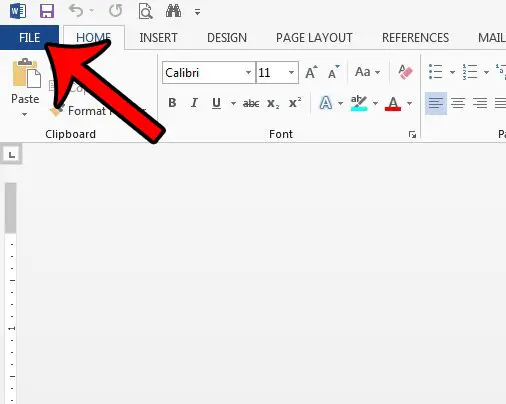
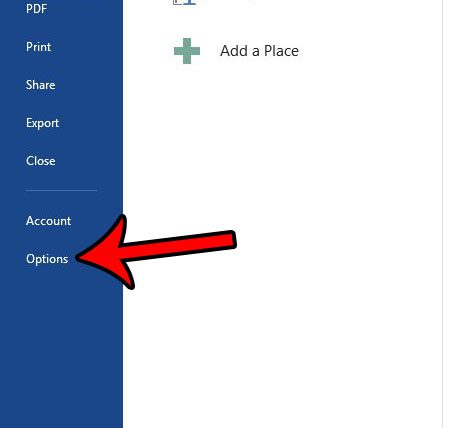
Step 2: Click File at the top of the window, then click Options at the left side of the window.
This opens a new window, titled Word Options.
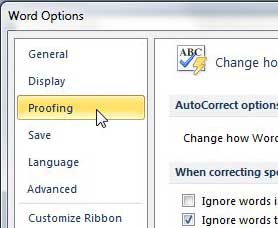
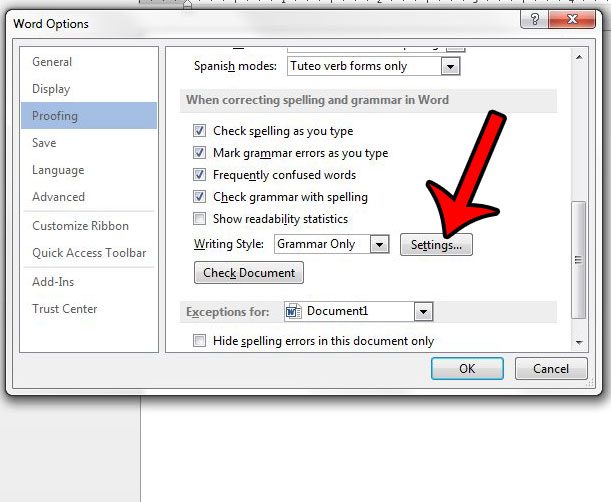
Step 3: Click the Proofing option at the left side of the Word Options window.
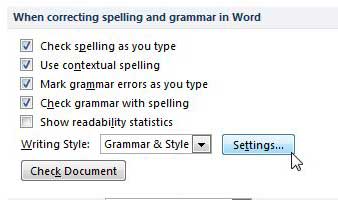
Step 4: Click the Settings button to the right of the Writing Style drop-down menu in the When correcting spelling and grammar in Word section.
This opens a Grammar Settings window.
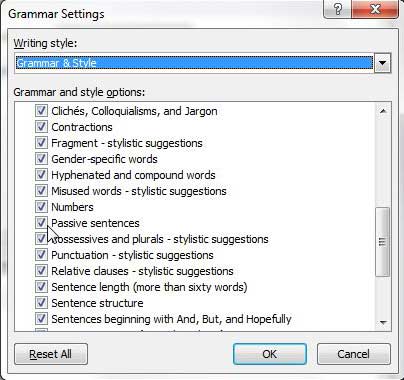
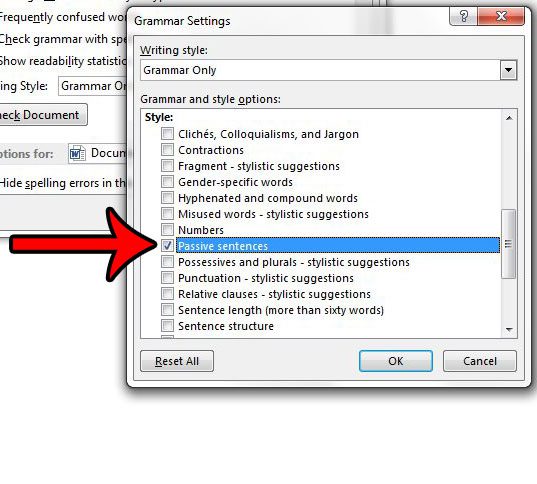
Step 5: Scroll down to the Style section of the Grammar Settings window, then check the box to the left of Passive sentences.
While you are here, you can also check the boxes for any additional options for which you would like the checker to search. Click the OK button at the bottom of the Grammar Settings window, then click the OK button at the bottom of the Word Options window to close it and apply your changes.
How to Use the Passive Voice Checker in Word 2013 (Guide with Pictures)
The method for enabling this feature is very similar in Word 2013 as it is in Word 2010.
Step 1: Launch Microsoft Word 2013.
Step 2: Click the File tab at the top-left corner of the window.
Step 3: Click Options in the column at the left side of the window.
Step 4: Click the Proofing tab.
Step 5: Scroll down and click the Settings button that is to the right of the Writing Style drop-down menu.
Step 6: Scroll down and click the box to the left of Passive sentences.
Word will include a passive voice check with the Grammar & Spelling check if there is a check mark in that box. You can then click the OK button at the bottom of each of the open windows to save and apply your changes.
More Information on How to Use the Passive Voice Checker – Word
While there isn’t a specific passive voice checker in Microsoft Word, it is an option that is part of the grammar checker. But if you have been trying to find passive voice in Word and haven’t found anything when you check for grammar, then it’s likely that the option isn’t turned on. Using the steps above should let Word highlight instances of passive voice. Microsoft Word 2019 also has options to check for passive voice. For example, if you go to File > Options > Proofing you can check the box next to Mark grammar errors as you type. Now when you are typing or when you perform a spelling and grammar check you should see passive verbs with a blue underline. If this isn’t happening then Word may not be configured to detect passive voice errors (or you might just be typing in active voice.) If so then you will need to go back to the Proofing settings menu on the Word Options window, click the Settings button next to Writing Style, then select passive sentences. Note that there is another option on the Proofing dialog box that you can check to show readability statistics. If you enable that option then you will be able to see a score for how readable the document is after you have corrected the spelling and grammar mistakes that Word has identified. Once you have configured the Spelling and Grammar checker, you simply need to run it on your document to locate any grammar or spelling mistakes, including the one that checks for passive voice. You can follow the instructions in this article to learn how to run the checker on your document.
See also
How to insert a check mark in Microsoft WordHow to do small caps in Microsoft WordHow to center text in Microsoft WordHow to merge cells in Microsoft Word tablesHow to insert a square root symbol in Microsoft Word
After receiving his Bachelor’s and Master’s degrees in Computer Science he spent several years working in IT management for small businesses. However, he now works full time writing content online and creating websites. His main writing topics include iPhones, Microsoft Office, Google Apps, Android, and Photoshop, but he has also written about many other tech topics as well. Read his full bio here.
You may opt out at any time. Read our Privacy Policy